
🔧 How to Set Up Your FMX Integration in AD Assist
Integrating FMX with AD Assist lets your facility events sync seamlessly. Here’s a step-by-step guide to help you get set up:
✅ Step 1: Turn on FMX Integration
-
Log into Schedules (AD Assist).
-
Navigate to your Manual Tasks.
-
Locate the setting for Third-Party Facility Event Updates and switch it to FMX.

-
Fill in your FMX details including your FMX Site Name (found in the prefix to your FMX url), User Name & FMX password (How to create this username and password located below)
- Set Up A User in FMX
Create a "Snap Syncer" User Type
- Create a new User Type in FMX specifically for the integration.
- The easiest way is to copy the “FMX Admin” user type and rename it to “Snap Syncer.”
- This ensures the syncer has full access and saves time manually checking permission boxes.
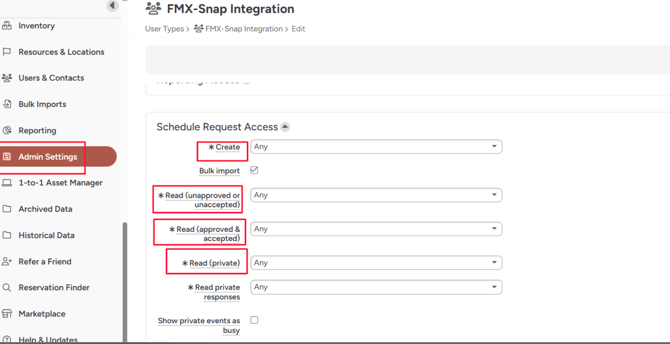
The Snap Syncer user type should have permissions to create, read, and respond to “Any” requests.
Within the Users & Contacts module in FMX:
- Create a dedicated user account that the integration will use to submit requests on behalf of Schedules (AD Assist).
- Assign this user the “Snap Syncer” user type to ensure they have the appropriate permissions to create, read, and respond to any request.
Next, navigate to the Request Type and Form Builder tabs within FMX's Admin Settings.
- These are where you’ll define and configure the required fields that Snap uses to successfully sync events.
⚠️ Once you save, this will remove all existing connections with other platforms (like ML). This step is permanent.
🏫 Step 2: Map Your Facilities
-
Go to the Maintenance → Facilities page in Schedules (AD Assist).
-
You’ll need to map each facility in Schedules (AD Assist) to a Building and Resource in FMX.
-
FMX Resources will only appear if they are marked as Locations and Schedulable in FMX.
-
-
Make sure each facility is linked to the correct FMX Resource.
🛠 Step 3: Confirm FMX Setup Requirements
Before enabling FMX integration, make sure the following are created in your FMX system:
Request Types
-
Snap! Home
-
Snap! Away
Custom Fields
| Field Name | Type |
|---|---|
| Snap! Event ID | Number |
| Snap! Opponent | Text |
| Snap! Facility | Text |
| Snap! Preparation Details | Multiline Text |
| Snap! Workers | Multiline Text |
These fields must be present in FMX to ensure successful syncing from AD Assist.
📅 Step 4: Sync Events to FMX
For events to show up in FMX:
-
The facility must be mapped to a FMX Resource.
-
When you create a new event in AD Assist with a mapped facility, it will automatically create a Schedule Request in FMX.
⏱ Update Timing:
-
Changes to existing events sync in real-time and should appear instantly in FMX.
-
Any updates in AD Assist will automatically push to FMX and update the existing event.
IMPORTANT: Past events do not sync automatically. If you need previous events synced, please contact Manage Support. At this time, we can only sync events from the current school year (July 1, 2025 – June 30, 2026).
📤 What Gets Sent to FMX?
When an event syncs, these details will be included:
-
Event Name
-
Event Date & Time
-
Facility Name
-
Opponent
-
FMX Facility Details
-
Preparation Info (including quantity if entered)
-
Workers (duties and names, if specified)
Please Note: Syncing is one-way—changes made in Schedules (AD Assist) will sync to FMX, but any updates made directly in FMX will not sync back to Schedules.
💡 Need Help?
If you're unsure whether your resources are correctly marked in FMX or events aren’t syncing as expected, double-check:
-
The FMX Resources are marked as locations and schedulable.
-
Your facilities are mapped correctly in AD Assist.
Still stuck? Reach out to manage.support@snapraise.com for assistance.